
How to list a product on Amazon: a step-by-step guide for 2026
How to list a product on Amazon: match an existing ASIN or create a new listing, with the GTIN, product type, attributes, copy and images each step needs.
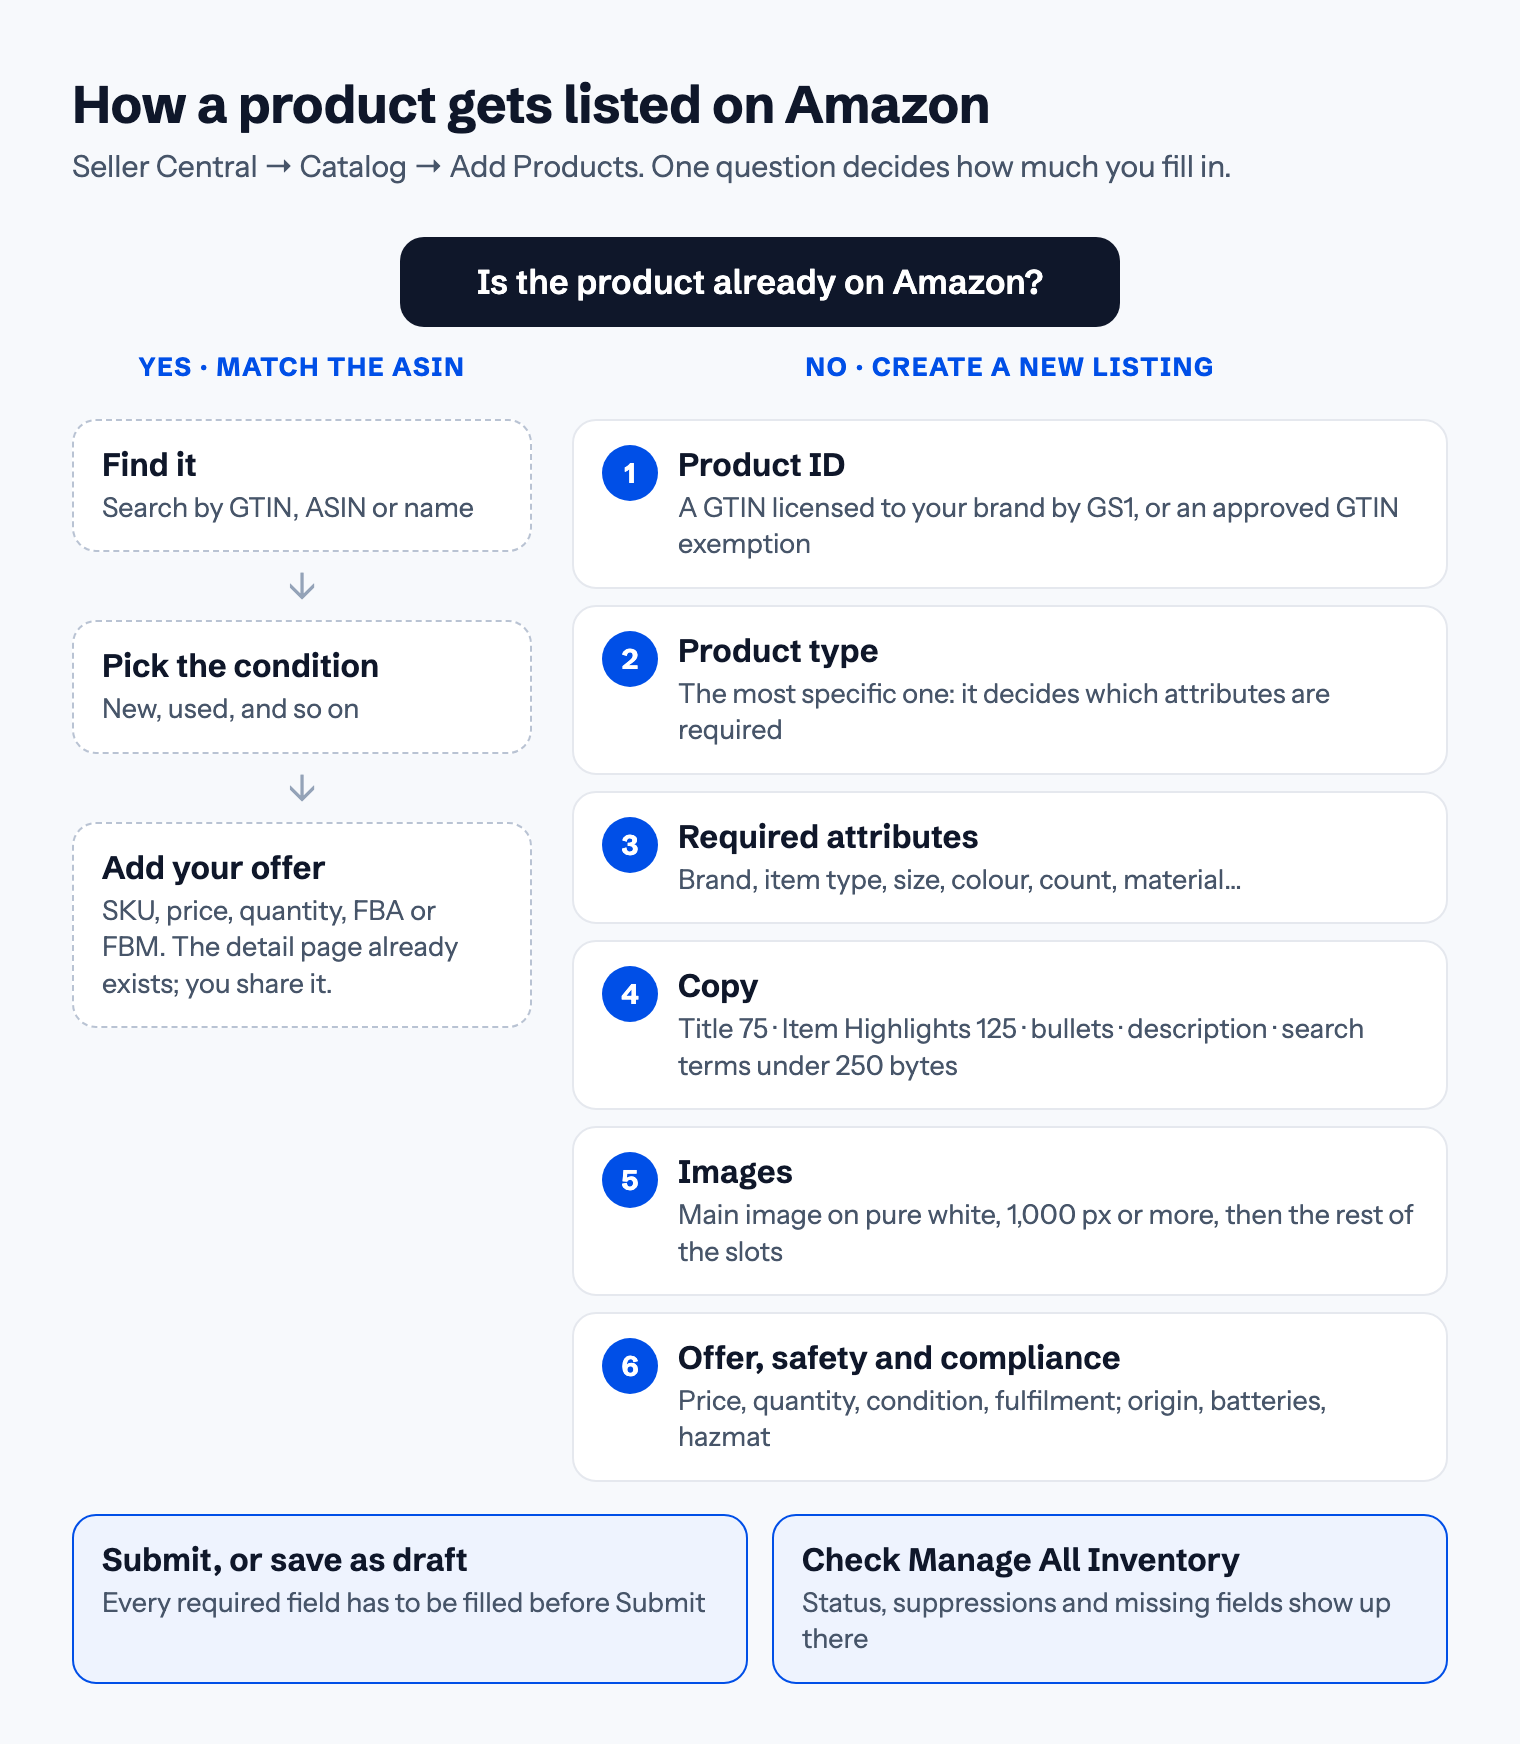
By Vlad Bazarov · Updated 25 September 2026 · 8 min readListing a product on Amazon starts in one place: Seller Central → Catalog → Add Products. From there it goes one of two ways. If the product is already in Amazon's catalog, you match the existing ASIN and add your offer, which takes a few minutes. If it is not, you create a new listing: a product ID, a product type, the attributes that type requires, the copy, the images, the offer and the compliance answers. This guide walks through both, in the order the form asks for them.
Before you start
Have these ready, because the form will ask for them and a half-finished listing is easy to forget in drafts:
- A selling plan. Individual costs $0.99 per item sold; Professional costs $39.99 a month and adds the bulk tools, including spreadsheet uploads.
- Approval, if the category or brand is gated. Some categories and brands ask for approval before you can list in them. Seller Central tells you when you try to add the product.
- A product ID. Usually a GTIN: a UPC or EAN from the barcode. Amazon checks it against the GS1 database, and a GTIN that is not licensed to the brand on the listing is treated as invalid. If your product has no barcode, see the GTIN exemption below.
- A SKU for each item, your own code for it. Every variation (size, colour) gets its own.
- The facts: dimensions, weight, materials, count, what is in the box, country of origin, battery and hazmat information where it applies.
- The copy and the images, written and shot to Amazon's limits before you open the form. The limits are in our table of every listing limit.
Step 1: search the catalog first
In Add Products, search by GTIN, ASIN or product name. If the exact product appears, you do not create anything: pick the condition, then click to sell it and fill in the offer. The detail page already exists, and you share it with every other seller of that ASIN.
Only create a new listing when the product is genuinely not there. A duplicate detail page for a product that already has one is against Amazon's policies, and it splits the reviews and the sales history between two pages.
If the product is your own brand and it is enrolled in Brand Registry, only you and sellers associated with your brand can create or suggest changes to its detail pages through the standard listing tools.
Step 2: the product ID, or a GTIN exemption
For a new listing Amazon asks for the product ID first. A UPC bought from a reseller that is registered to someone else will fail the GS1 check, so buy barcodes from GS1 for the brand you sell under.
Products that have no barcode, such as handmade goods, some private-label items and bundles, can apply for a GTIN exemption. You apply for a brand and product type, with photos that show the brand on the product or its packaging and no barcode. Once it is approved, list under exactly the same brand name, spelled and capitalised as in the request, and the product ID field becomes optional for that brand.
Step 3: the product type decides the form
Next you pick the product type. This choice matters more than it looks: it decides which attributes are required, which filters the product can appear in and which category-specific rules apply. Choose the most specific type that describes the product, not a parent node. A misplaced product type is hard to fix later and costs traffic that no keyword can bring back.
Step 4: fill the required attributes, then the rest
The form is split into tabs: product identity, description, product details, offer, and safety and compliance. Required fields are marked, and you cannot submit while one is empty. Fill them first, then go back for the optional ones.
Do not stop at the required fields. Material, size, colour, count, compatibility and special features are what Amazon's filters and its shopping assistant read before the prose. An empty attribute is a filter the product never shows up in. More on this in how Rufus reads a listing.
Step 5: the copy
| Field | Limit | What goes there |
|---|---|---|
| Title | 75 characters | Brand, product type, the one differentiator people filter by |
| Item Highlights | 125 characters | Three to five reasons to buy that the title does not repeat |
| Bullet points | 10–255 characters each | Five different questions answered, one per bullet |
| Description | 2,000 characters | Plain text: what the bullets could not fit |
| Search terms | under 250 bytes | Words the visible copy does not already use |
The backend field is counted in bytes, not characters, and over the limit Amazon may ignore it. How to fill the 250 bytes has a worked example. You can check a whole draft against these limits in the free listing checker before you paste it into Seller Central.
Step 6: images
The main image carries strict rules: a pure white background, the product filling at least 85% of the frame, a photograph of the real product, no text or badges, at least 1,000 px on the longest side. A main image that breaks them can get the listing suppressed from search. The other slots are free for lifestyle shots, an infographic, how-to steps and the details people zoom in on. The full list is in main image requirements.
Step 7: the offer, compliance and submit
On the offer tab set the price, the quantity, the condition and the fulfilment channel: FBA if Amazon stores and ships the product, FBM if you ship it yourself. Then answer the safety and compliance questions: country of origin, batteries, dangerous goods, age restrictions, certifications where your category asks for them.
Click Submit, or Save as draft to come back later. The new listing appears in Manage All Inventory, usually within minutes, sometimes longer. That page shows its status, and it is where a missing field or a suppression shows up first.
Check you have everything
Tick off what you have in hand. The list follows the order the Add Products form asks for it, and nothing you tick leaves the page.
Listing readiness checklist
Next: Account. Selling plan chosen: Individual or Professional
Runs in your browser; nothing you type leaves the page. Check a whole listing
Listing many products: the spreadsheet template
With a Professional plan you can list in bulk instead of one form at a time. In Add Products, choose the spreadsheet upload, pick the product types and the marketplace, and download the template. It is an Excel file with instructions, definitions of every field, examples and the sheet you fill in; the columns depend on the product types you picked. Upload the filled file from the same page and Amazon processes it, then reports any rows it rejected with the reason.
The same rules apply to a spreadsheet as to the form. A template makes it faster to repeat a mistake across a hundred rows, so check the first few listings live before you upload the rest.
After it goes live
- Open the listing on a phone, where most shoppers see it: the title cut-off and image 2 look different there.
- Check each child variation, not only the parent.
- Run through the listing audit checklist a week after launch, and again whenever Amazon changes a rule.
Where Cobalt12 fits
Steps 4 to 6 are where a listing takes hours: the attributes for your product type, a title, highlights, bullets, description and backend keywords that fit their limits, and a set of images. Cobalt12 does them from one phone photo and a competitor audit of your category, meters each field against its limit as it writes, and keeps the facts consistent across the text, the attributes and the images. You can try it on your own product; the first listing is free.
This article reflects Seller Central's Add Products flow and Amazon's published requirements as of September 2026. Category style guides add rules of their own, so check Seller Central help for your category.